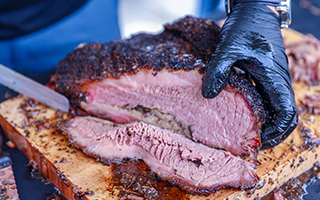
Father's Day is just around the corner, and what better way to honor the special Dads in our lives than with a delicious homemade meal? And I’m honoring my dad by sharing his special Beef Brisket recipe with the world. (Don’t worry I asked for permission first!)

So let's fire up the grill and prepare a tender and flavorful beef brisket that will leave your Dad's taste buds singing.
Step 1: Choose the Right Brisket -
Selecting a high-quality brisket is crucial for a successful outcome. Look for a brisket with good marbling and a deep red color. Opt for a choice-grade brisket if available, as it typically yields a more tender and juicy result. Aim for a brisket that weighs around 10 to 14 pounds, as it tends to cook evenly.
Dad’s Hot Tip: My Dad’s favorite place to find his brisket is Costco. He claims to find the best deals on quality cuts there. Don’t be afraid to ask the person behind the meat counters for their suggestions and info on special deals.
Step 2: Trim the Fat… but not all of it! -
Before seasoning your brisket, it's essential to trim any excess fat. Start by placing the brisket on a clean cutting board with the fat side up. Use a sharp knife to carefully trim the fat, leaving about a ¼ inch layer. This thin layer of fat will render and add flavor during the cooking process.
Step 3: Season the Brisket -
Now comes the fun part. Create a flavorful rub by combining kosher salt, black pepper, paprika, garlic powder, onion powder, and any additional spices you prefer. Generously coat all sides of the brisket with the rub, ensuring an even distribution. Be sure to let the brisket rest at room temperature for about 30 minutes to allow the flavors to penetrate.
Dad’s Hot Tip: Here’s the mix my Dad uses for his rub. However, I advise you to follow your gut more than the measurement requirements. My Dad usually mixes everything together and then adds a little more of this or that until the rub tastes just right to him. It always turns out perfectly.
1/3 cup brown sugar
2 tablespoons paprika
1 tablespoon smoked paprika
2 1/2 teaspoons black pepper freshly ground
1 tablespoon kosher salt
1 tablespoon garlic powder
1 tablespoon onion powder
Step 4: Preparing the Grill -
For that authentic smoky flavor, we suggest cooking the brisket on a grill. Set up your grill for indirect heat by lighting only one side of the burners or placing the charcoal on one side. Preheat the grill to a temperature of around 225-250°F (107-121°C). This low and slow cooking method is crucial for achieving tender and juicy brisket.
Dad’s Hot Tip: My Dad likes to use apple and cherry wood chips for his grill. He will soak the wood chips in water for about an hour before adding them to the grill. This step ensures the chips will smoke well instead of burning too quickly.
Step 5: Cooking the Brisket, Let the magic begin:
Place the seasoned brisket on the cool side of the grill, away from the direct heat source. Close the lid and let the grill do its thing. Maintain a consistent grill temperature of 225-250°F (107-121°C) throughout the cooking process. The cooking time may vary depending on the size of your brisket, but as a general guideline, plan for about 1 to 1.5 hours per pound of brisket. Use a meat thermometer to monitor the internal temperature and remove the brisket when it reaches around 195-205°F (90-96°C) for a tender and easily sliced result.
Dad’s Hot Tip: Wrap the brisket in butcher block paper for the last few hours of your grill. By this time the brisket has earned its crispy darkened outer layer and you want to ensure it does not burn. Wrapping helps seal in the moisture and juices for the duration of the cooking process.
Step 6: Resting and Slicing:
Once your brisket reaches the desired temperature, remove it from the grill and let it rest on a cutting board at least 30 minutes . Resting allows the juices to redistribute, resulting in a juicier and more flavorful brisket. When ready, slice the brisket against the grain into thin slices for maximum tenderness.
Serve immediately and Enjoy!


